Hardwood Floor Refinishing NJ is inexpensive and gives your home a fresh look. It’s important to use quality products, such as stain and varnish. Before starting, remove all furniture and tape tarps to doorways to prevent wood dust from seeping into rooms that aren’t refinished. Also, make sure you have plenty of room to work.
If your wood floors show wear and tear, sanding is the first step in refinishing.
Aggressive sanding will damage the surface of your hardwood floors, so it’s important to plan carefully and take your time. It’s also a good idea to rent a floor sanding machine from a flooring specialty shop rather than a general rental store, as a qualified salesperson can help you select the right equipment for your job.
When refinishing wood floors, you’ll also need to have a few other supplies on hand. Sanding and finishing generate a lot of dust and fumes, so it’s a good idea to stock up on protective gear like ear protection, a face mask, and eye protection. If you’re using oil-based stains or polyurethane, you’ll need to invest in a NIOSH-approved organic vapor respirator as well.
The sanding process will leave a lot of dust, so you’ll need to vacuum frequently to keep the air in your work space clean. It’s also a good idea not to sand too much at any one time; always switch to a higher grit paper after every pass, and be sure to re-stock your sandpaper as necessary. If you don’t change the paper often enough, you’ll end up with a series of shallow scratches that can be blotchy and uneven once you apply your finish.
Once you’ve sanded the floor, use a pole sander or buffer to do one final pass over the entire room to “blend” the new sanding. You should also sand the edges of your floors to make them smooth and even.
Before you start sanding, it’s a good idea to lay down drop cloths throughout your home to prevent damage to furniture and to keep dust from drifting into areas other than the hardwood floor itself. You’ll also want to raise low-hanging light fixtures and nail down loose boards to prevent them from ripping or gouging the sanding belt on your machine. If you’re using a hand sander, countersink all nails by at least 1/8 in. Nails left exposed will snag and gouge the sandpaper, creating a lot of unnecessary work for you.
Hardwood floors are renowned for their beauty, but they also provide durability and longevity. When properly installed and cared for, they can last a lifetime and amortize their relatively high cost over the years. In fact, wood floors in some historic homes are still going strong after 100 years.
To help ensure hardwood flooring looks its best, it’s important to understand which cleaning supplies will be safe for the floor’s finish. This starts by identifying the type of finish, which is usually one of two: surface finishes or penetrating finishes. Surface-finish floors, like urethane or polyurethane, form a protective barrier that keeps liquids from seeping into the wood and staining it. These floors can be cleaned with water-based cleaners, but it’s best to avoid using excessive amounts of water or over-saturating the floor.
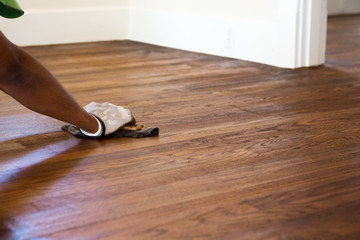
Penetrating-finish floors, such as those made from oak or mahogany, contain natural oils that can make them a little more resistant to spills than surface-finish floors. To keep them looking their best, it’s a good idea to use a solvent-based cleaner such as mineral spirits on a cloth and rub over 2-foot sections of the floor at a time. When the floor is dry, a light coating of refinishing wax can be applied to protect the finish and give it a shiny sheen.
Regardless of what type of finish a floor has, it’s a good idea to sweep and vacuum regularly to remove dirt and debris from the surface. In addition, putting doormats at every entrance and adopting a no-shoe policy in the home can reduce the amount of dirt, dust and grit brought onto hardwood floors, which can cause scratches and warping.
When deciding how often to mop, remember that it will depend on factors such as the number of people in the home, whether there are pets and what weather is like outside. For the most part, though, Sokolowski says sweeping or vacuuming daily and mopping once a week for busy areas and biweekly for less-busy areas will keep hardwood looking its best. If a floor becomes really dirty, she recommends using a commercial hardwood spot cleaner or reaching into the medicine cabinet for hydrogen peroxide. This works as a powerful stain remover without damaging the floor’s finish.
Staining your hardwood floors can bring new life to them, and is a great way to add some color to the room. However, there are several considerations that need to be taken into account before proceeding with the staining process. This is one home improvement project that is best left to professionals. They can get the job done faster and more efficiently, and they will be able to help you navigate through the various factors that can affect the outcome.
Before staining, it is important to clean up the dust from the floor and remove any wax or oil based finish from the surface of the wood. This will ensure that the stain adheres properly to the wood, and that it won’t peel or flake off later on. It is also a good idea to test out the stain on an inconspicuous area of the floor to see how it turns out. This will give you an idea of what the final product is going to look like, and allow you to make any necessary adjustments to achieve the desired results.
It is also important to apply the stain as soon as possible after sanding. Bare wood will begin weathering as soon as it is exposed to moisture, and this can cause the grain of the wood to raise and become uneven. The stain will help to prevent this from happening, and it will also protect the bare wood until you are ready to apply a top-coat finish.
If you choose to use an oil-based stain, it is a good idea to wear a mask and work in a well-ventilated area. The smell of an oil-based stain can be quite strong, and it can linger in the air for a long time. It is also a good idea to use a large applicator when applying the stain, and be sure to wipe off excess product after each swipe.
A water-based stain will typically require less ventilation, but it is still a good idea to keep the room well ventilated as you apply and wipe off the product. It is also a good idea to apply a couple of coats of the stain, allowing each coat to dry in between.
Once the sanding is complete, it’s time to put on the final coats of finish. It’s best to do this in stages so the floors don’t become too dry between coats, resulting in dullness and flaking. It’s also a good idea to work outside or in another room, as the fumes from the urethane are not pleasant to breathe.
There are many types of floor finishes, though most homeowners choose polyurethane, a moisture-resistant oil-based or waterborne plastic coating. You know your floors have this type of finish if they look as though they’re covered with a plastic film and you can’t scrape up any gummy residue.
Other types of finish include penetrating oils and waxes. These are more likely to show scratches, requiring the floors to be refinished more frequently. They also require a longer waiting period before the floors can be used, making it impractical for households with young children or pets.
Moisture-cure urethane is a tough, durable option for commercial applications, but it’s not typically recommended for use in homes, as it takes a long time to dry and requires families to relocate while the floors cure. It’s also highly toxic and releases a lot of VOCs, so it’s often a good idea to hire a professional for this type of job.
If you’re considering a DIY approach, it helps to do a little research on the products you want to use, and gather together a few friends or family members willing to help move furniture and sand the floors. You’ll also need to invest in a drum sander and 60-, 80- and 100-grit sanding disks. Make sure you bag the sanding dust, and keep it away from anything flammable or prone to static electricity.
Hardwood flooring is extremely durable, but it can reach a point at which repair is no longer cost-effective or practical. When this happens, it’s often more cost-efficient and less stressful to replace the floor altogether. This is particularly true if the hardwood has extensive water damage or termite or pest infestation issues. The floorboards may also be too thin from previous refinishing, making replacement the best option.